
Reference
参考博客GAN学习指南:从原理入门到制作生成Demo - 知乎 (zhihu.com)
原理篇
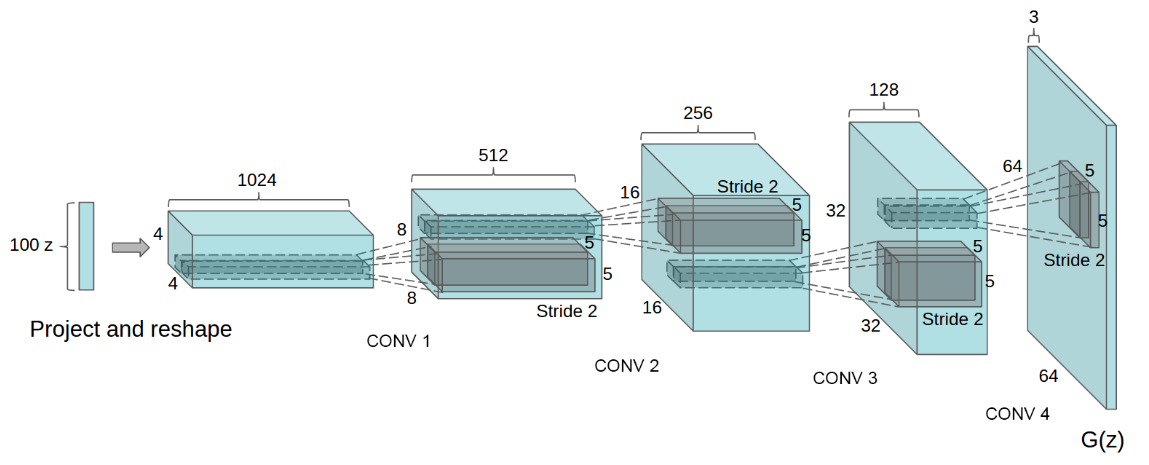
DCGAN的原理和GAN是一样的,这里就不在赘述。它只是把G和D换成了两个卷积神经网络(CNN)。DCGAN对卷积神经网络的结构做了一些改变,以提高样本的质量和收敛的速度,这些改变有:
- 取消所有pooling层。G网络中使用转置卷积(transposed convolutional layer)进行上采样,D网络中用加入stride的卷积代替pooling。
- 在D和G中均使用Batch Normalization
- 去掉FC层,使网络变为全卷积网络
- G网络中使用ReLU作为激活函数,最后一层使用tanh
- D网络中使用LeakyReLU作为激活函数
DCGAN中的G网络示意:
数据篇
作为伪二次元,选择参考这篇立本友人的工作Chainerで顔イラストの自動生成 - Qiita
突然发现是15年的帖子,8年前的旧东西力(悲

图片采集
写一个简单爬虫,我们爬这个动漫网站http://konachan.net/. 注意需要翻墙,不然需要人机认证

原理就是遍历网站的不同页面,先把html下载下来,用BeautifulSoup解析html,找到缩略图的src属性,直接下载就好了.也没有针对反爬虫做什么东西(快说谢谢konachan)
import requests
from bs4 import BeautifulSoup
import os
import traceback

def download(url, filename):
    if os.path.exists(filename):
        print('file exists!')
        return
    try:
        r = requests.get(url, stream=True, timeout=60)
        r.raise_for_status()
        with open(filename, 'wb') as f:
            for chunk in r.iter_content(chunk_size=1024):
                if chunk:  # filter out keep-alive new chunks
                    f.write(chunk)
                    f.flush()
        return filename
    except KeyboardInterrupt:
        if os.path.exists(filename):
            os.remove(filename)
        raise KeyboardInterrupt
    except Exception:
        traceback.print_exc()
        if os.path.exists(filename):
            os.remove(filename)


if os.path.exists('../imgs') is False:
    os.makedirs('../imgs')

start = 1
end = 8000
for i in range(start, end + 1):
    url = 'http://konachan.net/post?page=%d&tags=' % i
    print(url)
    html = requests.get(url).text
    soup = BeautifulSoup(html, 'html.parser')
    for img in soup.find_all('img', class_="preview"):
        target_url = img['src']
        filename = os.path.join('../imgs', target_url.split('/')[-1])
        # print(filename)
        download(target_url, filename)
    print('%d / %d' % (i, end))
图片裁剪
下载下来的图片还是太大了,据友人说整张生成的效果不是很好,所以需要用到人脸裁剪工具,把图片裁小一点(正常二次元都拿人头当头像,这很合理).工具同样用用人提到的lbpcascade_animeface,基于opencv的库.

import cv2
import sys
import os.path
from glob import glob

def detect(filename, cascade_file="../lbpcascade_animeface-master/lbpcascade_animeface.xml"):
    if not os.path.isfile(cascade_file):
        raise RuntimeError("%s: not found" % cascade_file)

    cascade = cv2.CascadeClassifier(cascade_file)
    image = cv2.imread(filename)
    gray = cv2.cvtColor(image, cv2.COLOR_BGR2GRAY)
    gray = cv2.equalizeHist(gray)

    faces = cascade.detectMultiScale(gray,
                                     # detector options
                                     scaleFactor=1.1,
                                     minNeighbors=5,
                                     minSize=(48, 48))
    for i, (x, y, w, h) in enumerate(faces):
        face = image[y: y + h, x:x + w, :]
        face = cv2.resize(face, (96, 96))
        save_filename = '%s-%d.jpg' % (os.path.basename(filename).split('.')[0], i)
        cv2.imwrite("../faces/" + save_filename, face)


if __name__ == '__main__':
    if os.path.exists('../faces') is False:
        os.makedirs('../faces')
    file_list = glob('../imgs/*.jpg')
    for filename in file_list: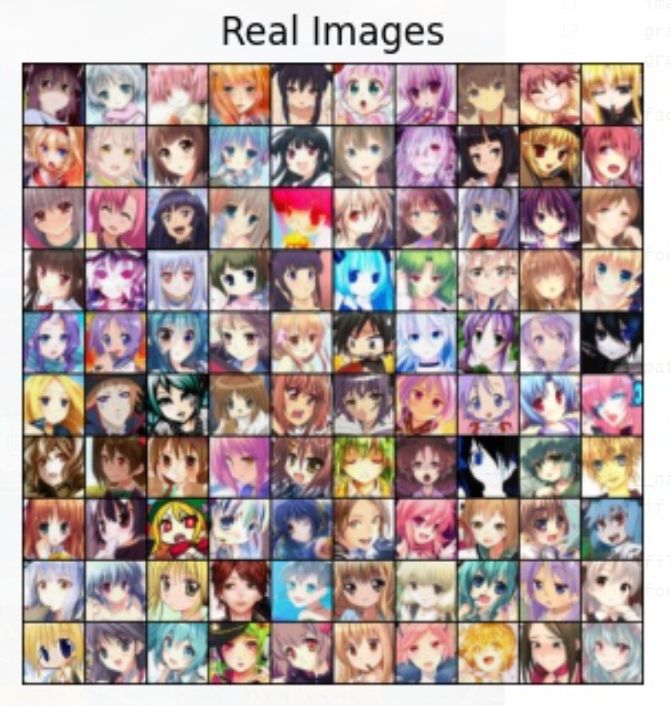
detect(filename)最后效果就是这样,很糊是因为每张图片只有64x64.友人用的是96x96.而我为了加快速度就直接用DCGAN本来的64x64了.(好处是可以直接扒Pytorch写的DCGAN)
训练篇
立本友人在博客原文用的是Chainer,我压根没听过的框架.所以我们就用Pytorch吧(笑)
这部分代码我们直接去Pytorch官方库上去找.链接在这examples/dcgan at main · pytorch/examples (github.com)
我们只需要稍微修改一下项目结构和dataset即可.接下来就稍微说一下主要修改的地方吧.
dataset
dataset其实大部分也是抄的Pytorch,比如transform那部分,最后一个Normalize我就第一次见(标准差都是0.5???),虽然很像改成经常见面的ImageNet的数据,但是二次元好像和ImageNet也不搭(
具体来说就是把图片整到img文件夹下,然后直接用ImageFolder创建dataset.这里注意img下面还需要子文件夹放图片,这个子文件夹对于ImageFolder来说就是不同的类别.当然我们这里不需要用到类别标签,因为所有图片的label都是1,意味着是真实图片.
class ReadData():
    def __init__(self,data_path,image_size=64):
        self.root = data_path
        self.image_size = image_size
        self.dataset = self.getdataset()

    def getdataset(self):
        dataset = datasets.ImageFolder(
                root=self.root,
                transform=transforms.Compose([
                    transforms.Resize(self.image_size),
                    transforms.CenterCrop(self.image_size),
                    transforms.ToTensor(),
                    transforms.Normalize((0.5,0.5,0.5),(0.5,0.5,0.5)),
                ])
            )
        print(f'Total size of dataset:{len(dataset)}')
        return dataset

    def getdataloader(self,batch_size=128):
        dataloader = DataLoader(
            self.dataset,
            batch_size=batch_size,
            shuffle=True,
            num_workers=8
        )
        return dataloader

if __name__ == '__main__':
    dset = ReadData('./imgs')
    print("ok")
    dloader = dset.getdataloader()
model
Generator和Discriminator两个类没什么好说的,都是Pytorch的(甚至变量名都没改) 注意这里还有一个权重初始化函数weights_init
class Generator(nn.Module):
    def __init__(self,nz,ngf,nc):
        super(Generator,self).__init__()
        self.nz = nz
        self.ngf = ngf
        self.nc = nc

        self.main = nn.Sequential(
            # input is Z, going into a convolution
            nn.ConvTranspose2d(self.nz, self.ngf * 8, 4, 1, 0, bias=False),
            nn.BatchNorm2d(self.ngf * 8),
            nn.ReLU(True),
            # state size. (ngf*8) x 4 x 4
            nn.ConvTranspose2d(self.ngf * 8, self.ngf * 4, 4, 2, 1, bias=False),
            nn.BatchNorm2d(self.ngf * 4),
            nn.ReLU(True),
            # state size. (ngf*4) x 8 x 8
            nn.ConvTranspose2d(self.ngf * 4, self.ngf * 2, 4, 2, 1, bias=False),
            nn.BatchNorm2d(self.ngf * 2),
            nn.ReLU(True),
            # state size. (ngf*2) x 16 x 16
            nn.ConvTranspose2d(self.ngf * 2, self.ngf, 4, 2, 1, bias=False),
            nn.BatchNorm2d(self.ngf),
            nn.ReLU(True),
            # state size. (ngf) x 32 x 32
            nn.ConvTranspose2d(self.ngf, self.nc, 4, 2, 1, bias=False),
            nn.Tanh()
            # state size. (nc) x 64 x 64
        )
    def forward(self,input):
        return self.main(input)


class Discriminator(nn.Module):
    def __init__(self,ndf,nc) -> None:
        super().__init__()
        self.ndf=ndf
        self.nc=nc
        self.main=nn.Sequential(
            # input is (nc) x 64 x 64
            nn.Conv2d(self.nc, self.ndf, 4, 2, 1, bias=False),
            nn.LeakyReLU(0.2, inplace=True),
            # state size. (ndf) x 32 x 32
            nn.Conv2d(self.ndf, self.ndf * 2, 4, 2, 1, bias=False),
            nn.BatchNorm2d(self.ndf * 2),
            nn.LeakyReLU(0.2, inplace=True),
            # state size. (ndf*2) x 16 x 16
            nn.Conv2d(self.ndf * 2, self.ndf * 4, 4, 2, 1, bias=False),
            nn.BatchNorm2d(self.ndf * 4),
            nn.LeakyReLU(0.2, inplace=True),
            # state size. (ndf*4) x 8 x 8
            nn.Conv2d(self.ndf * 4, self.ndf * 8, 4, 2, 1, bias=False),
            nn.BatchNorm2d(self.ndf * 8),
            nn.LeakyReLU(0.2, inplace=True),
            # state size. (ndf*8) x 4 x 4
            nn.Conv2d(self.ndf * 8, 1, 4, 1, 0, bias=False),
            # state size. (1) x 1 x 1
            nn.Sigmoid()
        )

    def forward(self,input):
        return self.main(input)

def weights_init(m):
    classname = m.__class__.__name__
    if classname.find('Conv') != -1:
        nn.init.normal_(m.weight.data,0.0,0.02)
    elif classname.find('BatchNorm') != -1:
        nn.init.normal_(m.weight.data,1.0,0.02)
        nn.init.constant_(m.bias.data, 0)
train
模型训练主要是之前提到的V(G,D)函数的实现,我们其实可以发现它的形式很像二元交叉熵.所以这里直接用BCELoss就可以实现.BCELoss — PyTorch 2.0 documentation
$$
BCELoss = -(y\log(x)+(1-y)\log(1-x))
$$
- 更新D模型时,需要将$\log(D(x))+\log(1-D(G(z)))$最大化,对于第一项.我们可以选择将$-log(D(x))$最小化,所以我们用BCE时,使用的标签值是1.这样就可以用反向传播使$\log(D(x))$最大化了.即
$$
BCELoss_{D(x)} = -\log(D(x))
$$
- 第二项同理,对于$D(G(z))$我们使用标签值为0.那么同样可以反向传播使$\log(1-D(G(z)))$最大
$$
BCELoss_{D(G(z))}=-\log(1-D(G(z)))
$$
- 更新G模型时,原论文需要让$\log(1-D(G(z)))$尽可能小,不过如果D模型比较强的话,这个值会很小,会出现梯度小时的情况让G很难训练.所以论文里也提到可以让$\log(D(G(z)))$尽可能大.那么对于$D(G(z))$,我们使用标签值为1(尽管这是一张假图片)
$$
BCELoss_{D(G(z))}=-log(D(G(z)))
$$
其他的就没什么不一样啦~大家直接看Pytorch源码即可.
效果篇
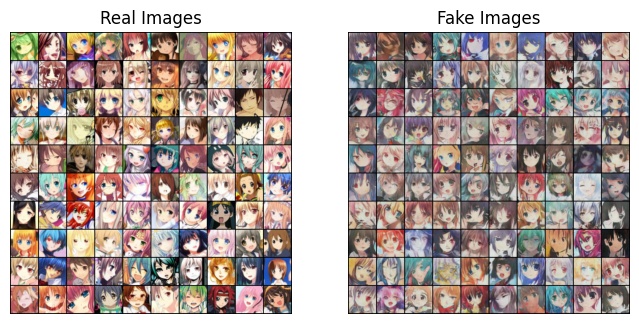
- epoch=20,感觉还可以
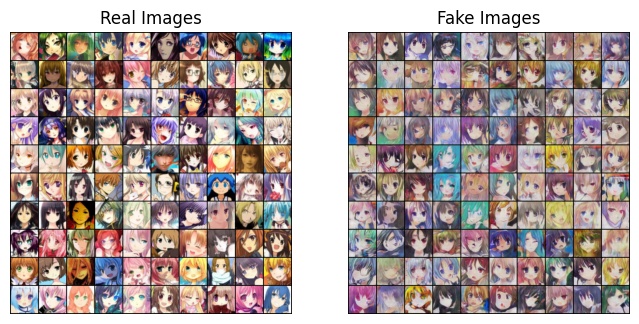
- epoch=120,挺好的
- epoch=150,最好效果
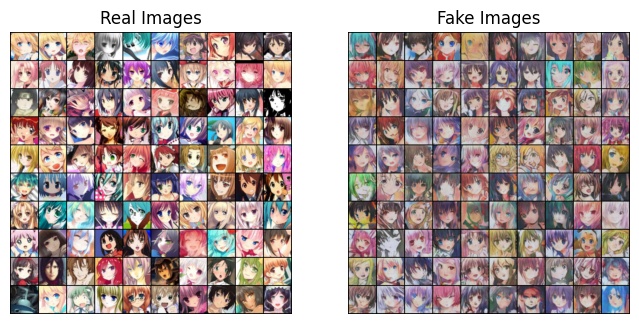
- epoch=155,不对劲
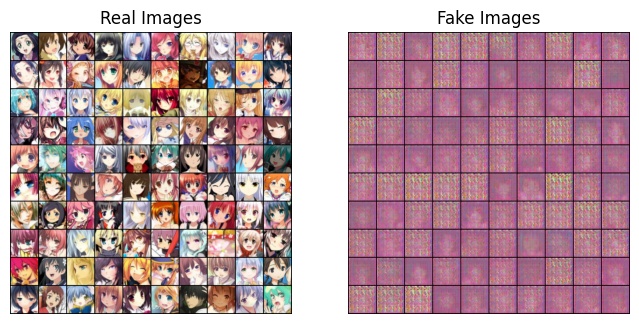
- epoch=180,寄力
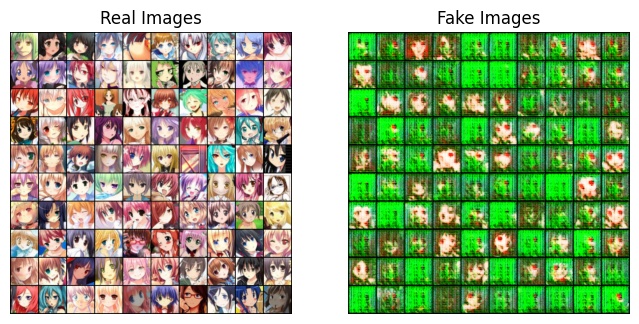
- epoch=190,Generator摆烂了
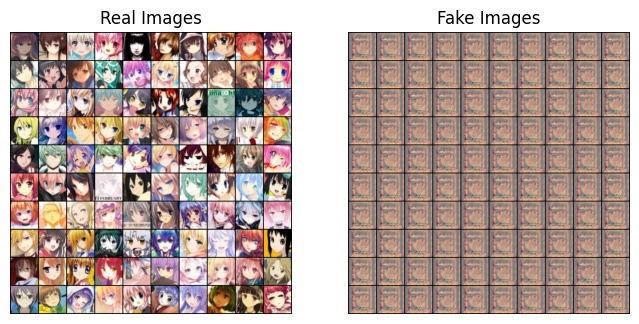
- 看一下训练情况.发现D模型Loss已经降到0,且分类效果非常好.而G师傅已经不行了

上述对比警示我们: D模型太好G模型是会摆烂的
最后代码放在仓库里了.JJJYmmm/Pytorch-DCGAN-Anime (github.com)
评论